Editing Zones
Editing zone contents is done in the zone details page, which is openend by clicking on the name of a zone in the main window.
Zone Details Page
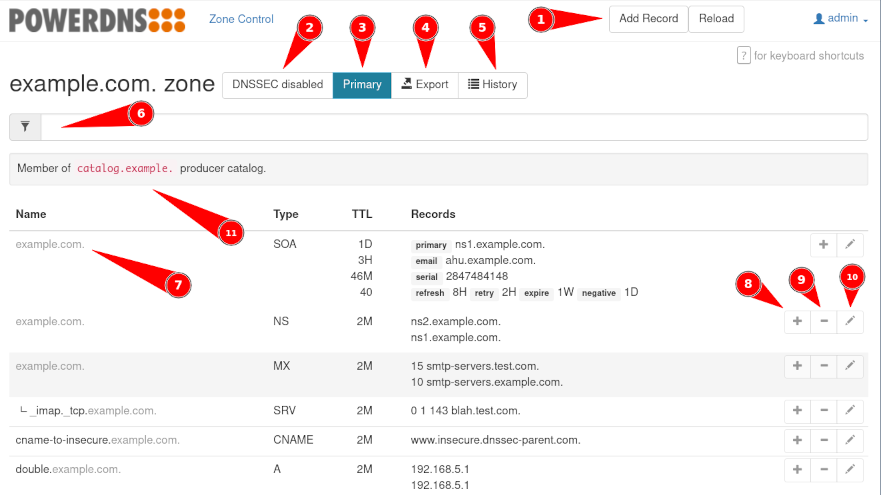
Fig. 5 The zone details screen of ZoneControl.
This page lists all the DNS records in the zone in a table.
11 shows which catalog (“Producer”) this zone is part of. If the zone is not part of a catalog this element will not be shown.
Each row has the following elements:
Name (7) shows the exact name of this record. It is fully qualified, which means that it includes the parent zone’s name.
The Type field shows the type of the record.
TTL: The Time to Live value of this record, shown in a shorthand if possible. Possible value suffixes for this shorthand are: ‘H’ for ‘Hours’, ‘M’ for ‘Minutes’, ‘D’ for ‘Days’ and ‘W’ for ‘Weeks’. If no unit is present, the value is given in seconds.
The Records column shows the record’s data for Name and Type and contains several buttons to manipulate this record. 8 is a shortcut for 1 and opens the New record dialog window with the current domain prefilled. Pressing 9 slates the record for deletion and 10 opens the Edit record dialog. When the logged-in user’s permissions are insufficient, or when the zone cannot be edited (e.g. because it is a secondary zone), these buttons are not visible.
When more than 200 records exists, the list is paginated. The page-controls are at the bottom of the records and the hotkeys f and b (or the right and left arrow keys) can be used to go a page forward or backward, respectively.
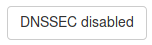
Fig. 6 The DNSSEC button when DNSSEC is disabled for this zone.
At the top of this window, next to the zone name, several buttons provide additional information about the zone. These buttons can be clicked to open a dialog window with relevant configuration items.
2 shows the DNSSEC state of the zone. It is green when DNSSEC is enabled and white when it is disabled. Clicking this button opens the DNSSEC dialog window.

Fig. 7 Native and Secondary zone buttons. The Primary zone button is not shown here.
The zone kind button (3) shows what kind of the zone this is. This is one of primary, secondary or native. Clicking this button opens the Zone kind dialog window.
Clicking the Export button (4) generates an export of the zone in zone file format. (this button is **not shown* when the user has RRSet limits)* Your browser will offer to download this file.
The History button opens the zone history window, where all the past changes to this zone are listed, with the latest changes on top. This view can also be used to restore a previous version of the zone if necessary.

Fig. 8 The Save changes button.
Any changes made to the zone in this window are not directy sent to the PowerDNS Authoritative Server, but kept within the browser. When there are pending changes, a button appears at the top of the window displaying the number of pending changes. Clicking this button opens the “Confirm Save” dialog.
Note
If you close the browser window without saving, your pending changes will be lost.
Zone Comment
To the right of the History button (5) there’s now an additional “chat bubble” button (not shown in the screenshot above) which will open an input field below the zone name to add a description for the zone.
Catalog Zones
Fig. 9 The catalog editing section of a Producer zone.
The zone page of a Producer zone has one extra element compared to other zone kinds: the “Catalog” tab. Inside this element zones can be added and removed from the Producer’s catalog. The [+] button will add a candidate zone to the catalog and the [-] button will remove a member zone from the catalog.
The “Records” tab shows the zone’s records similar to other zone kinds.
Both the “Member Zones” and the “Candidate Zones” lists support pagination and filtering.
The “Candidate Zones” also has a “Catalog” column showing whether a candidate is already part of another catalog. A zone can only be part of a single catalog.
Not shown here but member zone screens have a little extra element showing which catalog zone they are part of.
Adding a New Record
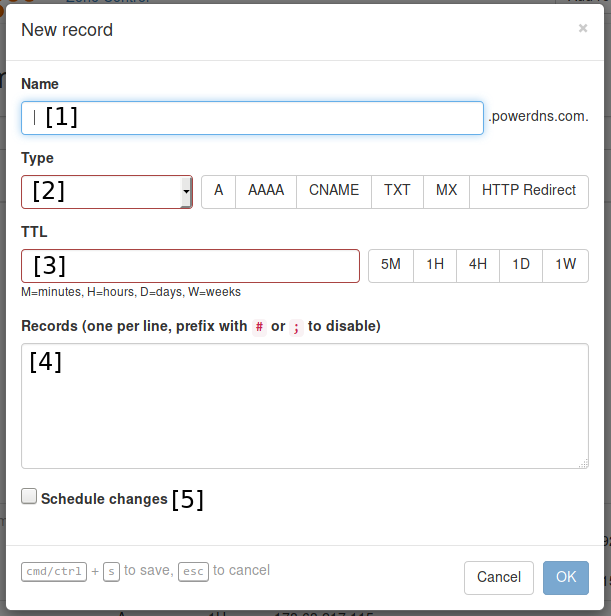
Fig. 10 The New Record dialog window.
When adding a new record, several pieces of information need to be filled in.
Field 1 contains the name of the record. The name on the record must always be relative to the zone, as alluded to in the dialog. Leaving this field empty creates a record at the top of the zone.
The selector at 2 specifies the type of record that will be added. The buttons to the right of this field are shortcuts to frequently used DNS types.
The TTL field (3) sets the Time to Live for this record. This field accepts a number of seconds, or a shorthand notation like “10M” for a 10 minute (600 second) TTL. To the right you will find several shortcuts for frequently used TTLs.
Note
In DNS, the TTL applies to the record set, not to a single record.
The Records field at 4 is used to input the contents of the record(s), one item per line.
You can prefix individual records with ; to disable them, in which case they will not be server by the DNS server.
Note
Disabled records will be validated on save, just like active records. You cannot use this for adding arbitrary comments.
When adding IPv4 and IPv6 addresses (A and AAAA records), the IP addresses can be suffixed with a * to indicate a PTR (“reverse”) record should be created for this address.
When adding PTR records for the in-addr.arpa or ip6.arpa zones there will be an additional input field, 6, where the “normal” (non-reversed) IP address can be entered which will then be reversed and put into the Name field (1).
Note
On save, the server will check if a zone exists to store the PTR in. These zone names usually end in in-addr.arpa for IPv4 and ip6.arpa for IPv6. If no suitable zone for the PTR exists, the whole save transaction is aborted.
Check the box at 5 to schedule this change for the future. See the chapter on scheduled changes for more information.
Upon clicking the “OK” button, the new record is added to the pending changes.
Editing a Record
After clicking the edit button (10 in Fig. 5), the Edit record dialog is opened.
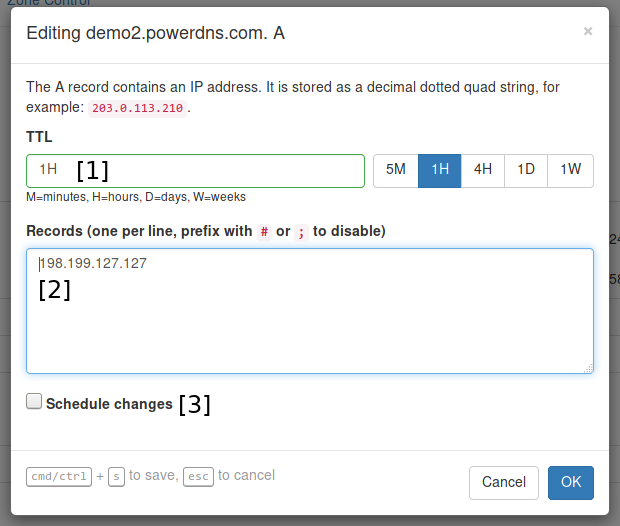
Fig. 11 The Edit record dialog window.
This dialog is a stripped-down version of the New record dialog. The name and type of the record are fixed and shown in the header of the dialog.
The TTL field (1) sets the Time to Live for this record. The field accepts a number of seconds, or a shorthand notation like “10M” for a 10 minute (600 second) TTL. To the right you will find several shortcuts for frequently used TTLs.
Note
In DNS, the TTL is per record set, not per single record.
The Records field at 2 is used to edit the contents of the record(s), one item per line.
Check the box at 3 to schedule this change for the future. See the chapter on scheduled changes for more information.
Saving Pending Changes
When editing, adding or deleting records, changes are not immediately saved to the DNS Server. Instead, these are ‘staged’ inside ZoneControl.
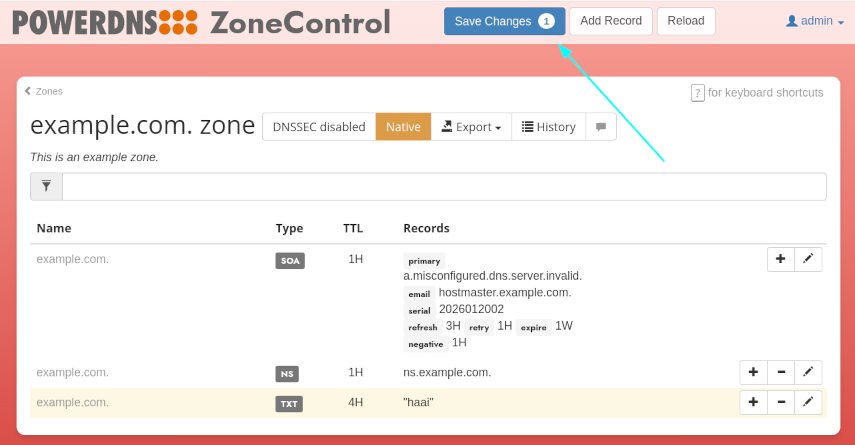
Fig. 12 The active button for saving pending changes on the zone screen.
When there are staged changes for a zone the “Save Changes” button will be active. Pressing this button will open a dialog with an overview of the changes that will be applied:
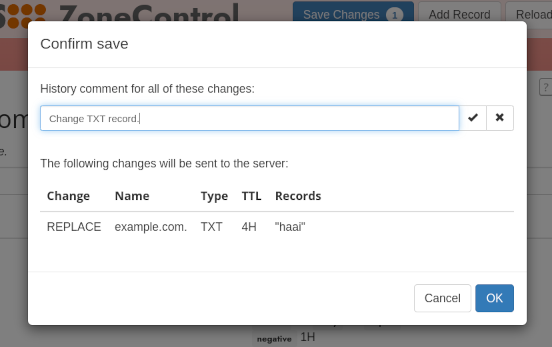
Fig. 13 The dialog for saving pending changes.
This dialog also has the option to add a comment for these changes. This comment will be visible in the zone history screen.
Changing DNSSEC Settings
Pressing the DNSSEC button (2 in Fig. 5 or Fig. 6 when DNSSEC is disabled) opens the DNSSEC dialog.
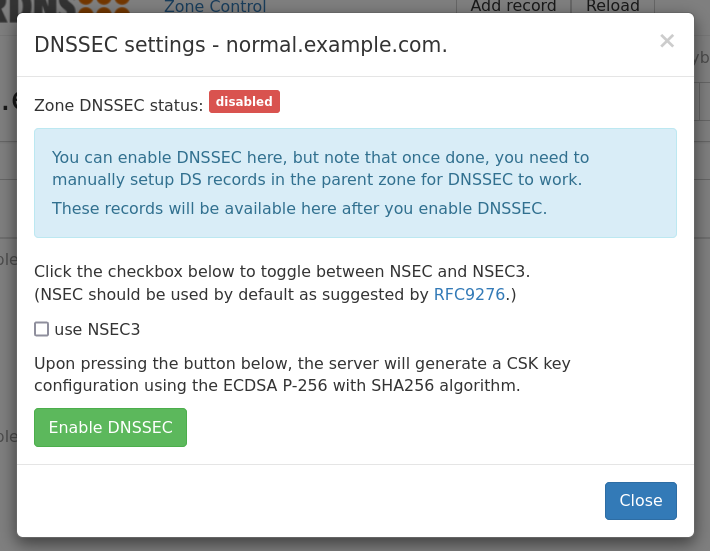
Fig. 14 The DNSSEC dialog for an unsecured zone.
By default NSEC will be used for DNSSEC. Checking the “use NSEC3” box will show an expanded dialog where one can edit the NSEC3PARAM.
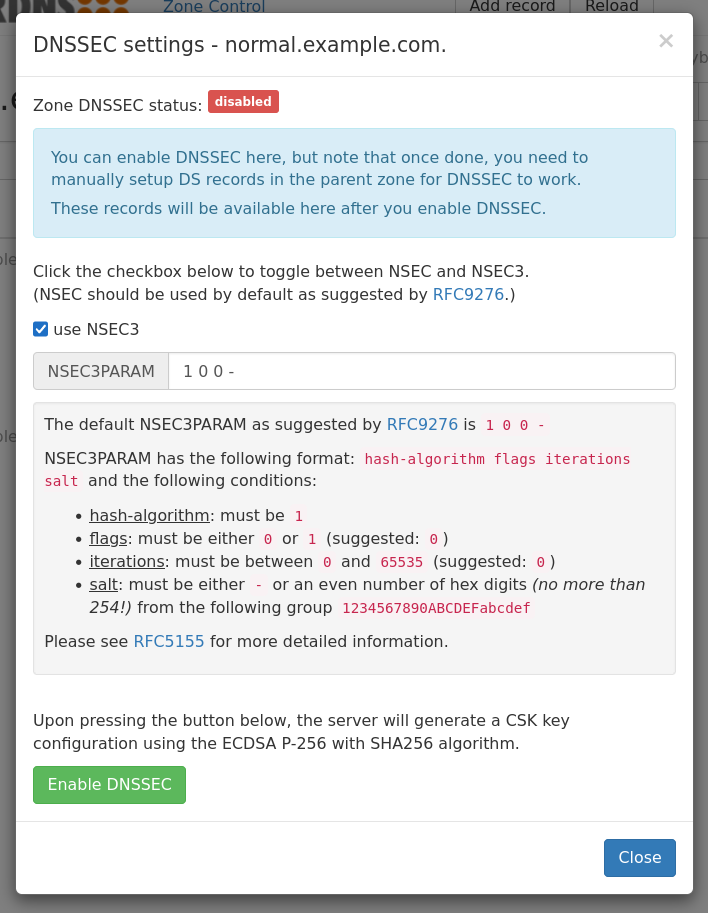
Fig. 15 The DNSSEC dialog for an unsecured zone with expanded NSEC3 settings.
Clicking the “Enable DNSSEC” button will enable DNSSEC for the zone. This adds cryptographic keys based on the settings of the PowerDNS Authoritative Server.
On a DNSSEC secured zone, the dialog displays the DNSSEC information that can be uploaded to the zone’s registry (see Fig. 16 for an example).
Note
Both the DS records and DNSKEY record are shown. Which of these need to be uploaded depends on the domains’s registry. Some registries require the DNSKEY to generate the DS records themselves.
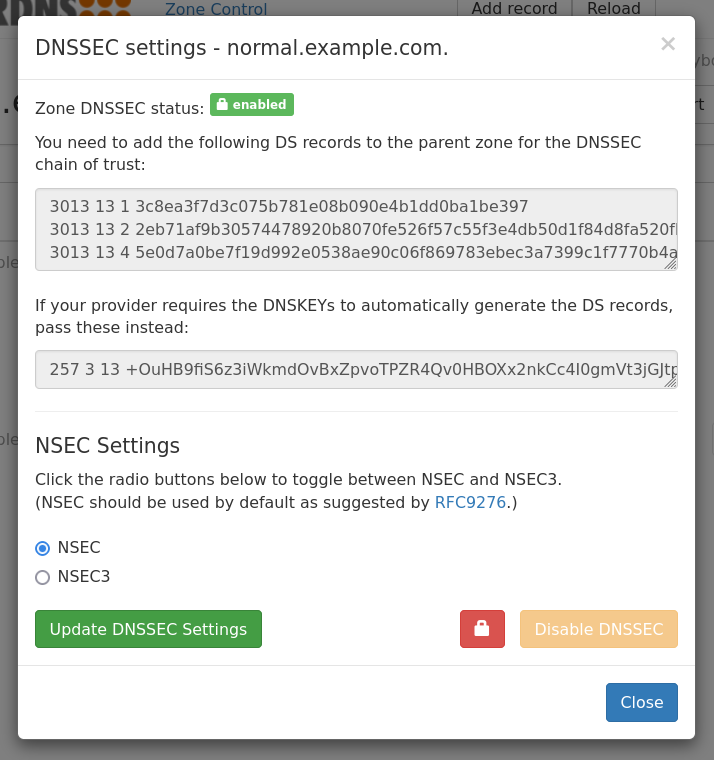
Fig. 16 The DNSSEC dialog for a secured zone.
This dialog can also be used to update the DNSSEC settings or to disable DNSSEC. As part of updating the DNSSEC settings it is possible to switch between NSEC and NSEC3 (the cryptokeys will be kept). Clicking the NSEC3 radio button will show the expanded NSEC3 settings similar to those in Fig. 15.
It is possible to disable DNSSEC here but be very careful with this (as shown in Fig. 17) as we do not have backup functionality in place in this version of ZoneControl. The “Disable DNSSEC” button will be disabled until one enables it by pressing the red lock / unlock button.
The “Disable DNSSEC” button can be disabled again by pressing the, now green, lock button.
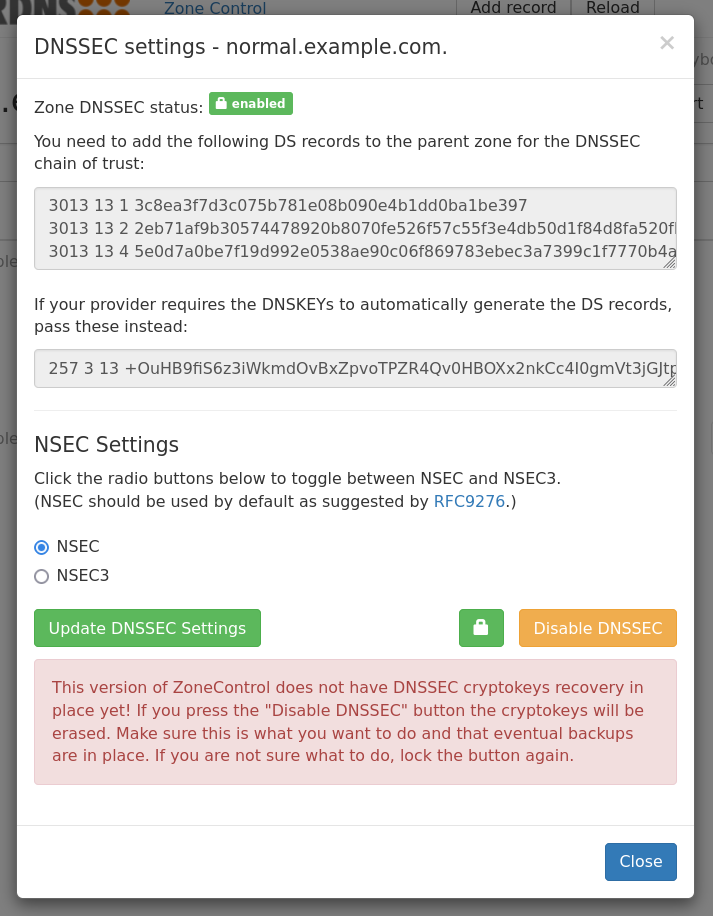
Fig. 17 The DNSSEC dialog with an unlocked “Disable DNSSEC” button
Zone Settings
Clicking the Zone Kind button (3 in Fig. 5 or Fig. 7) opens the Zone Settings dialog window. The options available in this dialog depend on the zone kind.
Native Zones
Native zones have the fewest settings, as there are no settings required for data replication.
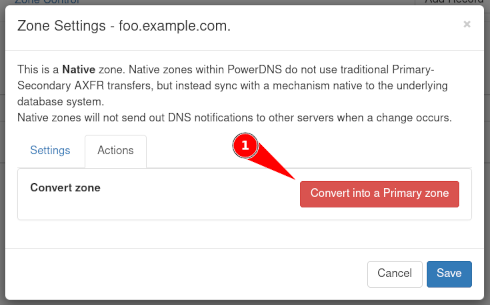
Fig. 18 The Zone settings dialog window for a native zone with an active Actions tab.
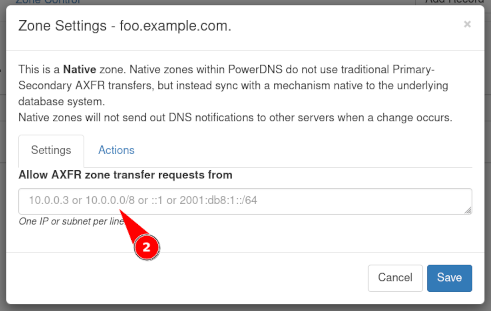
Fig. 19 The Zone settings dialog window for a native zone with an active Settings tab.
The button at 1 converts the zone from a native zone to a primary zone. (Zone conversion to a Producer zone is not available.)
Note
Changing from a native zone to a primary zone might require extra configuration in the PowerDNS Authoritative Server. For instance, the primary configuration setting will need to be enabled before notifications are sent.
As it is possible for native zones to be replicated via AXFR, the field at 2 allows configuration of IP addresses that may transfer this zone.
Primary Zones
For primary zones, the dialog in Fig. 20 is displayed:
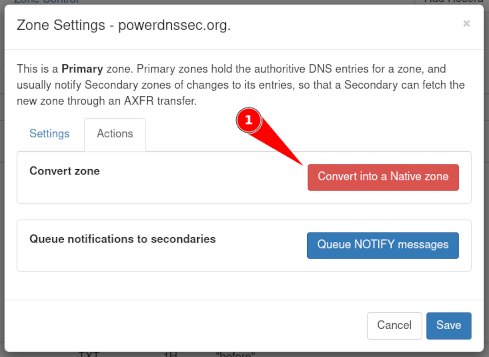
Fig. 20 The Zone settings dialog window for a primary zone with an active Actions tab.
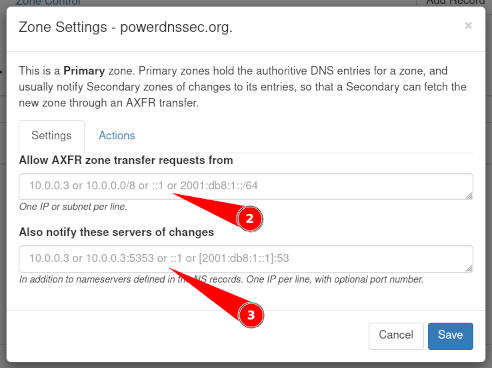
Fig. 21 The Zone settings dialog window for a primary zone with an active Settings tab.
The button at 1 converts the zone into a native zone. (Zone conversion is not available for Producer zones.)
Note
Converting into a native zone will make the PowerDNS Authoritative Server stop sending notifications for zone updates. It will still allow zone-transfers.
In field 2, IP addresses that are allowed to transfer the zone can be specified.
The IP adresses entered in the field at 3 will be notified when the zone has been changed, in addition to all the servers specified in the zone’s NS records.
Secondary Zones
The secondary zone dialog is show in Fig. 22.
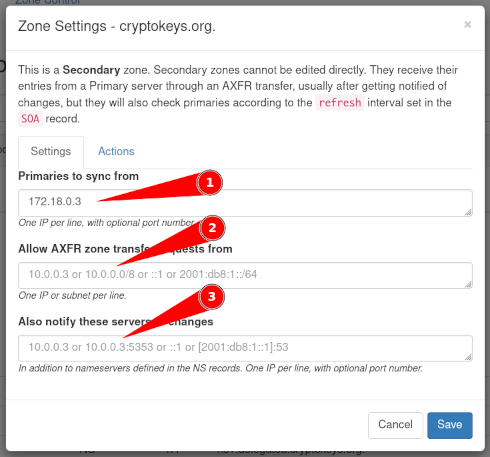
Fig. 22 The Zone Settings dialog window for a secondary zone.
The field at 1 is used specify the IP addresses of the primary(s) of this zone. These addresses can be suffixed with a port, should be it different from the default of ‘53’.
Note
When adding a port to an IPv6 address, the address part must be wrapped in square brackets to disambiguate the address from the port:
[2001:0DB8:AA::1]:5300
If this server is also a primary for other secondaries, the other two fields can contain relevant settings.
In the field at 2, IP addresses that are allowed to transfer the zone can be added.
The IP adresses entered in the field at 3 will additionally be notified when the zone has been changed. By default all servers in the zone’s NS records are notified of changes.
Zone History
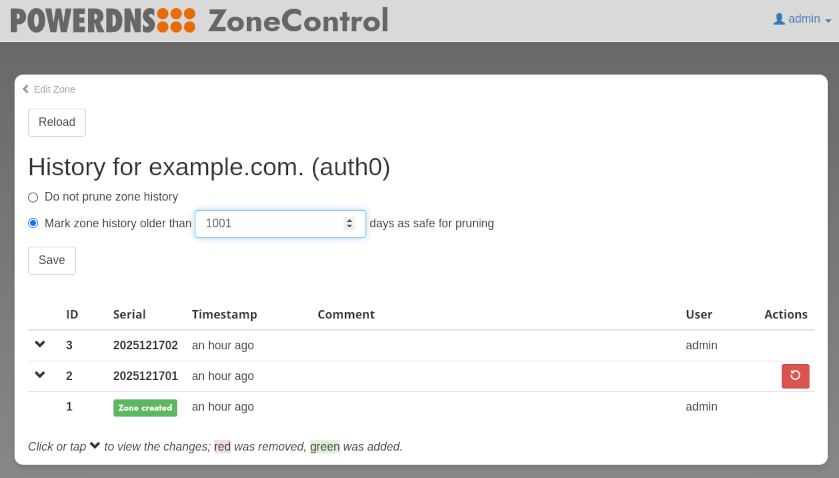
Fig. 23 The zone history screen.
The zone history screen shows a table of all changes done to a zone. If you have the permission you will also be able to restore an older version of the zone.
The prune settings will also only be shown if you have permission. It is important to note that marking a zone as safe for pruning does nothing by itself: the administrator has to run the pruning scripts regularly for zones to be pruned.