First Steps with ZoneControl
ZoneControl is a web-based tool that facilitates the editing of DNS domains, known as “zones”. It also supports modifying slave notification settings, AXFR settings and enabling DNSSEC on these zones.
Main window
After logging in, the main screen is presented.

Fig. 3 The main window of ZoneControl.
This window lists all the zones on all the servers. Each zone line consists of the following elements:
Name shows the full name of the zone. An additional label indicates it is read-only.
Kind is one of “master”, “slave” or “native”. A “slave” zone cannot be modified, as its data is retrieved from a master server. A “master” zone can be edited and is generally distributed to other DNS servers that serve as slaves. The “native” zone kind indicates data replication is not done via DNS-based replication, but via another mechanism, like database level replication.
The Serial is the serial number in the SOA record of this zone. This number is used by “slave” servers to check if their copy of the DNS data is still up to date. On “master” zones – and “slave” zones that are configured to send notifications – a cloud shaped icon is shown. A blue icon indicates that the serial number for which a notification was sent does not match the current serial number. A notification will be sent at a later moment (the exact time depends on the DNS server configuration), at which point the icon will turn green.
In the DNSSEC field, a label is present if this zone is DNSSEC secured.
The Server field shows the server on which this zone resides. A zone with the same name can be on multiple servers, for instance as a “master” on one, and as a “slave” on many others.
The Actions field has several buttons for quick access to some actions for the zone. These buttons are:
4 History. Shows the history of all changes made to records in this zone.
5 Export. Exports the zone to a zonefile format.
6 Delete. Deletes the zone from the server.
When more than 25 records exists, the list is paginated. The page-controls are at the bottom of the list and the hotkeys ctrl+f and ctrl+b can be used to go a page forward or backbrad, respectively.
Above the list of zones, several other fields and buttons are visible.
Number 1 is the search field. This can be used to filter the list of zones.
Clicking on 2 shows a dialog to add a new zone. This dialog is explained in another chapter.
The username is displayed at 3. Clicking the username will open a menu with several options, depending on the user’s permissions. This menu also contains the logout button.
Adding a zone
When clicking on the “Add zone” button in the main screen of ZoneControl, the “Add new zone” dialog window is shown. This dialog window has all the fields required to add a new zone.
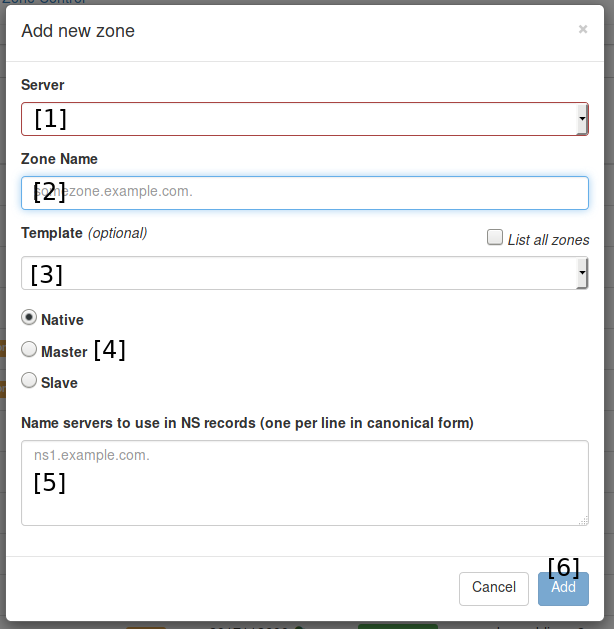
Fig. 4 The “Add zone” dialog window.
To add a zone, first select a server where this zone shall live (1). Then fill in the zone name at 2, with a trailing dot. Select the kind of zone this is at 4. Depending on the type of zone, one of two things will need to be filled in at 5.
Instead of filling in the details above it is also possible to select a template at 3. Please see Zone Templates for more information.
For native and master zones, fill in the NS records for this zone (with trailing dots).
Note
No corresponding slave zones are created on the specified servers, these need to be added manually.
For a slave zone, fill in the IP address(es) of the master server(s) for this zone.
After clicking the “Add” button (6), the data in this dialog is checked. If there are any input errors, they will be displayed in within this dialog. After the zone is added, the zone will appear in the main window’s zone list.
Once added, a slave zone will be retrieved from its master, and a master zone will send out notifications to its (potential) slave servers.